You should reinforce a storage cabinet as soon as its shelves or back panel deflect more than 0.02 inches per foot under normal load—like a 3‑foot particle‑board shelf sagging 3/32 in or a back panel bowing over 1 mm. Check the load capacity against the cabinet’s material grade; if it exceeds the 32 lb per square foot limit, add plywood strips, dowels, or braces. Verify that the reinforcement meets ANSI A208.1, CARB Phase 2, and fire‑rating standards, and you’ll uncover the exact steps for each cabinet type.
Spot Sagging on Particle‑Board Shelves Before Reinforcing
If you notice a particle‑board shelf bowing under the weight of dishes or books, you’re already seeing the first sign that reinforcement may be required. Conduct a visual inspection of the entire span: look for a front edge lower than the wall‑attached portion, measure deflection at 1/32″ per foot, and flip the shelf to reveal bottom bowing. Compare the observed sag to the 0.02″ per‑foot threshold; anything above indicates excess stress. Next, perform load testing by removing items, then incrementally adding known weights while monitoring deflection. Record when the shelf reaches 3/32″ total sag on a 3‑foot span or exceeds the 35‑pound per‑foot capacity. These precise metrics confirm whether the particle board has been overloaded and if reinforcement is necessary. The material type also significantly affects load‑bearing capacity, with denser composites offering greater strength than standard particle board. Selecting a cabinet with a reinforced frame can further prevent sagging and extend lifespan.

Widely application: The bracket has two mounting methods.Work perfectly for most drawers, Used to reinforce and repair wooden / MDF / chipboard drawers,Repairing those drawers that have sagged with age by strengthening the support and firmness of the base.

Widely application: The bracket has two mounting methods.Work perfectly for most drawers, Used to reinforce and repair wooden / MDF / chipboard drawers,Repairing those drawers that have sagged with age by strengthening the support and firmness of the base.

Widely application: The bracket has two mounting methods.Work perfectly for most drawers, Used to reinforce and repair wooden / MDF / chipboard drawers,Repairing those drawers that have sagged with age by strengthening the support and firmness of the base.
Identify Weak Back Panels When Reinforcing Particle‑Board Cabinets
When you examine a particle‑board cabinet, start by checking the back panel for flex or unevenness; a weak panel will bow inward or develop a noticeable gap between the edge and the interior frame. Measure the panelage with a straightedge; any deviation beyond 1 mm indicates panelageage that compromises rigidity. Inspect the screw holes for striping; stripped holes reduce hinge reinforcement effectiveness. Use a ruler to verify that the panel sits flush against the frame along the entire perimeter. If you detect a gap, score the surface lightly to expose the core, then apply a thin veneer of wood glue and a reinforcement strip. Reinforce the hinges with longer screws that penetrate the frame, ensuring the back panel regains structural integrity. Consider adding metal brackets to distribute load across the shelf. Choose a finish such as powder coating to protect the cabinet from scratches, chips, moisture, and UV damage in high‑traffic environments. Solid hardwood like oak or maple offers superior strength and can be used as a reference for long‑lasting durability.
Check Load Limits Before Reinforcing Particle‑Board Cabinets
Before you reinforce a particle‑board cabinet, you must verify that the intended load stays within the material’s capacity; exceeding the 32 lb per square foot limit (or the specific per‑shelf and per‑linear‑foot ratings for wall and base units) will cause sagging or failure regardless of added brackets. Conduct a systematic load testing routine: place a bathroom scale on the shelf, add weight incrementally, and record deflection. Compare the measured stress to the material grading chart—low‑density boards (≈31 lb/ft³) cap near 30 psf, while higher‑density grades (≈58 lb/ft³) approach 40 psf. Verify per‑shelf limits (20–50 lb) and per‑linear‑foot limits (30–50 lb for wall units, 400–600 lb for bases). If the projected load exceeds these thresholds, reinforce before installing heavy items. Load capacity should also be considered when selecting cabinet dimensions for the intended use. Understanding the material grading system helps ensure long‑term durability. Consider the moisture resistance of the cabinet material to prevent swelling that could reduce load‑bearing strength.

1.【Combination List】6 pcs cabinet hinge repair plate set includes: 4 pcs large hinge repair plates (3.54*3.54 inches), 2 pcs small hinge repair plates (3.54*2 inches), 36 pcs self-tapping fixing screws.

Crafted from high-quality 304 stainless steel, these corner brackets boast exceptional resistance to rust and corrosion. They are ideal for use in various environments, including humid areas like kitchens and bathrooms, ensuring long-lasting durability and a sleek, modern look.

【Complete Repair Kit】This cabinet hinge repair plate set provides a comprehensive solution for fixing loose or damaged hinges on various furniture. The kit includes 4 large and 2 small stainless steel repair plates, along with 36 self-tapping screws, ensuring you have all necessary components for a successful repair. The hinge repair plates are designed to redistribute stress from a single broken point to a wider area on the plate, significantly increasing stability and durability.
Choose How to Reinforce Particle‑Board Cabinets by Cabinet Type
Which reinforcement method you choose hinges on the cabinet’s environment and load demands, so start by categorizing the unit—kitchen, bathroom, garage, bedroom, or craftroom—and then match each type to its proven strengthening tactics. In kitchens, apply contact‑cemented laminate and seal the surface, then glue plywood strips to hidden undersides; this yields high Aesthetic finishes and a favorable Cost analysis. Bathrooms require moisture‑sealed laminate and backside plywood reinforcement, balancing durability with modest expense. Garage cabinets benefit from screwed plywood strips and impact‑resistant laminate, maximizing load capacity while keeping costs low. Bedrooms need simple glue‑or‑screw strips plus optional sealing, delivering a clean look at minimal cost. Craftroom units demand layered glue‑powder repairs, sanded flush finishes, and plywood shelving reinforcement, ensuring spill resistance and structural integrity. A thorough cleaning of the cabinet interior before reinforcement helps prevent dust from compromising the adhesive bond, and using a microfiber cloth ensures a smooth, lint‑free surface. Properly aligning the lock’s security pins during installation further enhances the cabinet’s overall resilience. Adding a reinforced hinge can significantly improve the cabinet’s ability to support heavier loads.

Package and Size: Contains 1 roll of wood veneer tape edge banding. Banding Size: 76mm / 2.99 inch (width) x 10 ft (length), which can make it easy to do.
Value Pack – Includes 2 rolls of cabinet protectors for kitchen cabinets. Each roll measures 1.5 inches wide by 10.5 feet long, suitable for repairing cabinet door frames and protecting furniture edges from scratches, wear, and aging.
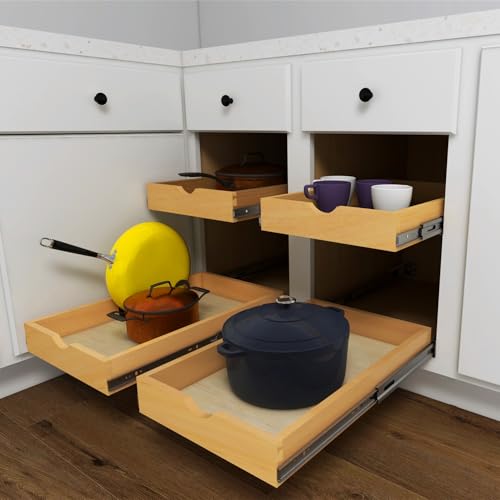
How to Add Bracing to Your Particle‑Board Cabinets
Adding bracing to particle‑board cabinets fortifies hidden surfaces, prevents wobble, and lets you load the unit without fearing cracks. First, measure interior height and width, then cut ¼‑inch plywood strips to span the back panel at mid‑height. Apply construction adhesive, then drive pocket‑hole screws through flat‑bottomed holes to avoid penetrating the exterior. For vertical reinforcement, insert wooden dowels into pre‑drilled dados on each side, aligning them with the center panel. Secure French cleats to the back using interior screws and glue; the 45‑degree bevel spreads wall load, essential when you mount DIY hinges or acoustic panels later. Finish by checking that all hidden supports sit flush, ensuring even load distribution and eliminating future cracks. Selecting the appropriate cabinet depth helps maintain stability while fitting within the space’s dimensions. Regularly dust and wipe surfaces to prevent moisture buildup that can weaken the bracing. Adjustable shelving offers customizable storage solutions that adapt to changing needs and maximize usable space.
Laminate, Cement, and Internal Boards for Rigidity
Your bracing work is only half the battle; to keep that rigidity under load you need a laminate‑cement‑board sandwich that locks everything together. Begin by sanding each surface with 80‑grit paper to expose a uniform profile; then roll a thin, even coat of solvent‑based contact cement on the board and the back of the laminate. Use a 3‑inch roller to eliminate globs, press firmly while the adhesive cures, and align the laminate edges precisely to avoid gaps. Add a ½‑inch particle board layer beneath the laminate, then reinforce cabinet ends with ¼‑inch veneered MDF or plywood strips, glued or screwed for maximum stiffness. Select cement types according to the material—solvent‑based for narrow edge banding, water‑based for melamine, and 3M Fast Bond 30 for general applications. This systematic sandwich maximizes rigidity without excess weight. Ensure adhesive readiness by removing dust and debris after sanding and cleaning. For optimal durability, consider using a high‑impact particle board core that resists warping over time. Understanding gauge thickness helps balance durability and cost when choosing material thickness. Fire‑rating standards dictate the maximum temperature a cabinet can endure before structural failure.
Safety and Regulatory Checks for Reinforced Particle‑Board Cabinets
Even before you start installing the reinforced particle‑board panels, you must verify that every component complies with the relevant safety and regulatory standards—ANSI A208.1 for physical and mechanical properties, CARB Phase 2 for formaldehyde emissions, and TSCA Title VI for nationwide limits. Conduct a systematic regulatory compliance audit: cross‑check each panel label for “CARB P2” or “TSCA Title VI” markings, request the General Certificate of Conformity, and confirm UL GREENGUARD Gold or KCMA certification on the lot. Record lot numbers, test dates, and VOC results to guarantee HUD 24 CFR Part 3280 and EPA limits are met. Maintain a verification log for each supplier, and flag any deviation before final installation, guaranteeing that reinforced particle‑board cabinets satisfy all statutory and performance criteria. Properly securing cabinets also helps prevent unauthorized access and aligns with the safety benefits highlighted in the lock considerations article. Additionally, compliance with FDA guidance on Good Storage Practices ensures that temperature‑sensitive contents remain within validated ranges. Choose high‑quality locks that are rated for the cabinet’s material thickness to maximize resistance to forced entry.

