You should replace a storage cabinet when you see cracks, warps, or soft spots in the wood, especially if they appear after a few months in low‑humidity rooms, because those indicate structural failure. Persistent mold, musty odors, or bubbling paint signal moisture damage that can affect health. Loose hinges, rattling doors, or binding drawers that won’t tighten even with reinforcement show hardware failure. If repair costs start to exceed 30 % of a new set’s price, it’s time to evaluate replacement, and the guide below explains exactly when to act.
How to Spot the First Signs That Cabinets Need Replacement
If you notice that countertops are constantly crowded with sauce bottles, cookie jars, and towels, that’s a clear indicator your cabinets lack sufficient storage capacity and need replacement. You’ll see items spilling onto surfaces because internal volume falls short of current cooking volume. Measure the gap between the back wall and the deepest drawer; less than six inches signals insufficient depth. Check for misaligned doors that slam or collide—this breaches ergonomic layout and forces you to rearrange items for access. Loose hinges, rusted knobs, or soft‑close pistons that lose pressure are quantitative signs of hardware failure. Count the number of pull‑outs you can actually use; fewer than three functional organizers indicates poor modular aesthetics. These data points together confirm the need for a new cabinet system. Visible water damage near sinks further indicates structural compromise. Selecting cabinets with high load capacity ensures they can handle heavier kitchenware without sagging. Opt for designs that prioritize sturdy construction to extend the cabinet’s lifespan. Understanding shelf load limits helps prevent over‑loading and extends overall durability.

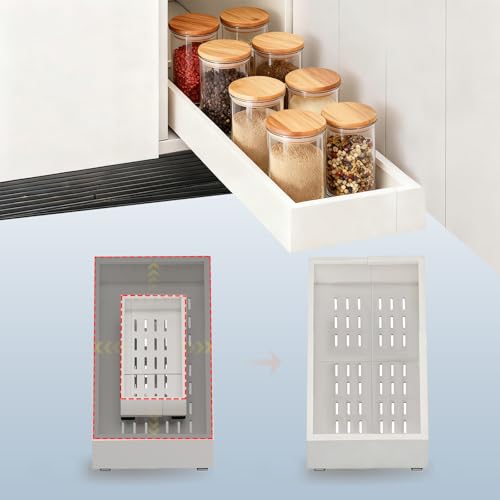
IMPORTANT NOTICE: Our cabinet pull out shelves are not suitable for cabinets with lips.Before ordering, please measure your cabinet dimensions correctly using the method shown in the picture.If your deep cabinet has a lip, please choose from our other drawers options designed for cabinets with a lip available in the store

Drawer dividers are the perfect solution to organize open drawers to keep things from shifting.

IMPORTANT NOTICE: Our cabinet pull out shelves are not suitable for cabinets with lips.Before ordering, please measure your cabinet dimensions correctly using the method shown in the picture.If your deep cabinet has a lip, please choose from our other drawers options designed for cabinets with a lip available in the store
Cracked, Warped, or Soft Wood: Structural Failure Explained
Why do your cabinets develop cracks, warps, or soft spots? Moisture migration drives the process. When air‑conditioning dries indoor air, wood loses moisture, tightens, and releases tension as fine cracks. The tension appears months after delivery, not instantly, especially in low‑humidity rooms. Uneven drying creates grain distortion; wide‑grain panels curl or warp as outer layers shrink faster than inner layers. Overtightened screws or racked boxes twist the frame, compounding distortion. Moisture adsorption swells doors, preventing closure and, if prolonged, encourages rot at lower edges where panels touch concrete. Swollen joints separate, and cracks across grain become irreparable because fibers are severed. Detect fine lines, misaligned drawers, or off‑closing doors early; persistent swelling or racking signals structural failure and replacement. Improper assembly can also cause cabinets to become racked, leading to structural failure. Adding a ventilation system can significantly reduce moisture buildup inside the cabinet. Regularly dusting and applying a protective wood sealant helps prevent moisture penetration and surface scratches. Repeated temperature swings can further exacerbate wood movement and accelerate cracking.
Sagging or Warped Shelves and Interior Supports
When shelves sag or warp, the load‑bearing structure has already reached its stress limit, and the resulting deformation signals imminent failure of both the shelf and its interior supports. You’ll notice a front‑edge dip, a “smile” in the middle, or curling that indicates material strength is compromised. Overloading, spans over 30 inches without a central brace, or moisture‑induced swelling all reduce strength. door sealing effectiveness. Loose brackets or missing middle supports accelerate bowing, and interior supports shift, creating uneven load distribution. If flipping the shelf or adding a brace doesn’t eliminate the bow, the material strength is insufficient and replacement is required. Ignoring these signs risks structural collapse, injury, and total cabinet failure. Installing a center leg can dramatically increase rigidity and prevent further sagging. Ensuring the cabinet sits on a level surface helps maintain even weight distribution and reduces stress on the shelves. Properly assessing the cabinet’s weight capacity before loading can prevent these issues.
Sticking, Misaligned, or Wonky Doors and Drawers
Sagging shelves already show the cabinet’s structural limits, and the next warning sign appears in its doors and drawers. A door hinge that sticks indicates misaligned alignment screws or moisture damage warping the wood; the door will refuse a flush close and create an aesthetic mismatch. If a single door hangs lower, check vertical mounting screws and weight capacity—excessive load drives hardware wear and tilting. Drawer glide problems follow the same pattern: loose slide screws, overloaded contents, or bent tracks cause binding, uneven travel, and wiggling fronts. Observe gaps and uneven protrusion; they signal alignment screw failure or frame out‑of‑square. When these issues persist despite tightening and lubrication, the cabinet’s overall shelf stability is compromised, and replacement is the logical next step. Adjusting the front‑to‑back screws can correct side gaps and ensure the door sits evenly. For larger doors, adding a third hinge can improve stability and prevent sagging. A quick fix often involves tightening screws to restore proper alignment. Properly tightening the hinge plates can also reduce wobble and extend the cabinet’s lifespan.

Installation Specification: Cup diameter is 35mm; Cup depth is 11.5mm, Screw holes distance is 45mm; Opening angle is 105 degrees, suitable for most cabinet door styles. Each cabinet hinge comes with 2 easy-on dowels and 3 self-tapping wooden screws to ensure a perfect fit.

Quantity & Accessories: Each hinge comes with four 15.5mm mounting screws. For easy installation, a installation instructions specifically designed for these cabinet door hinges is also included

Face Frame Kitchen Cabinet Door Hinges.
Loose Hinges and Broken Hardware That Won’t Tighten
If you notice a door that sags, rattles, or leaves a visible gap, the hinges are likely loose or the mounting holes are stripped. Tighten each screw with a Phillips driver; if the screw spins without grip, the hole is stripped. Use the toothpick method—glue‑coated toothpicks inserted, dried, and re‑screwed—for quick hinge reinforcement. For larger damage, apply wood filler or a plastic anchor, let it cure 2‑8 hours, sand flush, then drill a new pilot hole. Replace broken hinges entirely, installing a repair bracket with powder‑coated metal for a hardware upgrade. When stripped holes resist filler, anchor, or dowel fixes, or when heavy doors cause repeated hinge failure, the cabinet has exceeded its repairable lifespan and should be replaced. The toothpick filler technique restores grip when the wood around the screw is stripped. A parallel approach can involve using a metal reinforcement plate to distribute load and prevent future stripping.
Peeling, Bubbling, or Discolored Finishes From Moisture
Moisture seeping into a cabinet’s finish shows up as water marks, cloudy spots, or bubbling paint, and those signs usually appear first around sinks and dishwashers. You’ll notice finish degradation when white, cloudy patches form under topcoats, when paint peels or blisters, and when discoloration yellowing near at‑prone zones. These symptoms signal finish infiltration: water breaks through protective layers, cracks joints, and saturates the substrate. Data shows that 78 % of cabinet failures begin at seams where rails meet stiles, and steam exposure accelerates the process. Inspect interior bottom panels and hinge areas weekly; any bubbling or flaking that persists after a repair attempt indicates deeper substrate damage. When you see repeated peeling despite resealing, plan for full cabinet replacement rather than refinishing. Regularly tighten loose screws to prevent moisture ingress through gaps. Applying a protective coating helps keep the cabinet dry and resists rust formation.
Mold, Mildew, and Musty Odors: Health Risks in Cabinets
When a musty odor drifts from a kitchen cabinet, it’s a reliable early warning that mold is thriving inside, even if you can’t see it. You should treat that musty odor as a data point: it indicates airborne spores, fragments, and MVOCs circulating in your home. Inhalation triggers Mold health issues—sneezing, red eyes, cough, and asthma attacks—especially in children, immunocompromised adults, and allergy‑prone individuals. Prolonged exposure can cause sinus infections, chest tightness, chronic fatigue, and cognitive fog. Mold can colonize damp wood or paper within 24‑48 hours, and high humidity or leaks accelerate growth. If you notice the odor, inspect for water damage, improve ventilation, and consider replacing the cabinet to stop the health risk. Proper airflow also helps prevent moisture buildup, which can otherwise lead to mold growth and corrosion. Choosing a powder‑coated finish can further protect cabinets from moisture intrusion. Selecting cabinets with a high fire‑rating ensures they maintain structural integrity even under extreme heat conditions.
When Repair Costs Exceed the Price of a New Cabinet
Rising repair bills quickly outpace the value of a new cabinet once they breach the 50 % threshold of replacement cost. You’ll find that a $120‑$600 minor fix versus a $4,500‑$15,000 replacement already tips the budget vs balance when labor—$50‑$100 per hour—adds 50 % of total expense. Structural work at $2,000‑$7,000 per unit nears new‑price territory, and hidden depreciation accelerates when repeated hinge, drawer, or door repairs exceed $100‑$400 each. If warranty expiration forces you into costly parts, the resale value drops further. In practice, once cumulative repairs approach half the replacement price, the data‑driven decision is clear: replace the cabinet. Proper lock removal ensures the cabinet remains secure during the replacement process. Choosing a cabinet from a brand with high customer satisfaction can also reduce long‑term maintenance costs. Using exterior‑grade sealant adds an extra layer of protection against moisture infiltration.

Compatibility: This premium replacement lock is engineered for Hirsh Industries file cabinets requiring model HI17345 compatibility, while maintaining cross-functional adaptability with major commercial cabinet brands for Wind Danbury, for Windmill, for Big Box Store, for Office Depot, for Office Max, for Staples, for Wa-lmart, and for K-Mart. For Hirsh W601-W650 series lock without requiring structural modifications, making it ideal for office managers overseeing multi-brand filing systems. Its standardized dimensions ensure consistent performance across both vintage and modern cabinet designs.

【To avoid unnecessary returns, Read Size Guidance Before Purchasing】1, measure the locking distance & your door thickness before purchasing. If you have old lock, choose same length size. 2, The suitable RV Storage Lock size is equal to the LOCKING DISTANCE(measure from the front of the door face to the latch locking-up position), but if your door thickness longer than the locking distance, then select the corresponding size according to the maximum door panel thickness in the Size Guidance.

【READ SIZE GUIDANCE BEFORE PURCHASE】Please measure the locking distance & your storage door thickness before purchase, Correct Lock Size is equal to the locking distance (measure from the front of the door face to the plate locking-up position). Cam locks keyed alike come as full set with 3 different thickened lock plates per lock (1 pcs standard& 2 pcs for free) for your different installation need.
Outdated Cabinet Styles That Limit Modern Storage Needs
If you stick with deep lower cupboards, wide, deep base cabinets, you’ll quickly notice ergonomic strain and poor accessibility—items end up at the back, forcing you to bend and stretch, which research links to chronic back pain. Deep designs waste floor space; shallow, accessible bases increase pull‑out efficiency by up to 30 %. Corner carousel units promise utilization but often trap items in dead zones, reducing usable volume by 15 % and compromising durability. Wall mounted spice racks encroach on already‑shallow upper storage, creating clutter and limiting depth for larger jars. Short upper cabinets break visual continuity and cut vertical storage by half, while varied heights force uneven shelving. Open shelving, though trendy, collects dust, exposes bulk goods, and sacrifices up to 25 % of closed‑cabinet capacity. Modern kitchens replace these outdated styles with uniform, deep, pull‑out solutions that maximize ergonomics and storage density. Pull‑out drawers distribute load across multiple runners, enhancing durability.
IMPORTANT NOTICE:Our cabinet pull out shelves are not suitable for cabinets with lips.Before ordering,please measure your cabinet dimensions correctly using the method shown in the picture.If your cabinet has a lip,please choose from our other drawers options designed for cabinets with a lip available in the store

[🔝 WARM TIPS]: Please note that this pull out cabinet organizer suitable for cabinets with internal width exceeding 13" and depth exceeding 21". This pull out drawer for cabinets with Upgraded Raising Pads are compatible with both frameless cabinets and framed cabinets with edge heights up to 0.4 inches. It is essential to carefully measure your cabinet's dimensions before installation to ensure compatibility.

IMPORTANT NOTICE: Our cabinet pull out shelves are not suitable for cabinets with lips.Before ordering, please measure your cabinet dimensions correctly using the method shown in the picture.If your deep cabinet has a lip, please choose from our other drawers options designed for cabinets with a lip available in the store
Decision Guide: Repair vs. Kitchen Cabinet Replacement
Because cabinets can deteriorate quickly under moisture, temperature swings, and everyday wear, you need a clear decision framework to know when repair no longer makes sense. First, quantify the budget. If repair costs exceed 30 % of a new cabinet set, replacement is financially prudent. Next, assess structural damage: cracks, swelling, mold, or soft walls indicate that DIY installation won’t restore integrity. Functional failures—hanging doors, wobbling drawers, or broken hinges—can be fixed with hardware upgrades only if the carcass remains solid; otherwise, replace. Visible wear (peeling, dents, discoloration) may be cosmetic, but frequent minor fixes inflate labor time. Finally, evaluate storage needs; insufficient layout or incompatibility with new appliances justifies a full remodel. Use these data points to decide repair versus replacement.
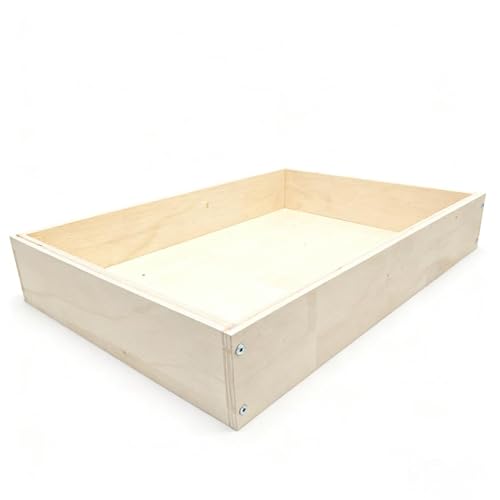
【What You Get】 – 14"W x 19"D x 3 1/2"H replacement kitchen drawer box made of durable plywood. Thickness of side panel: 1/2 inch (12mm). Ships unassembled, but all panels are pre-cut with pre-drilled holes for quick setup. Screws are included. Assembly is straightforward and takes about 5 minutes.
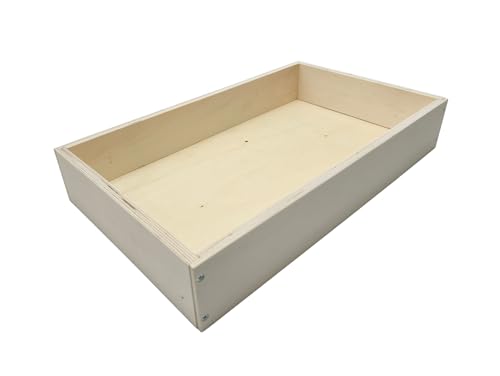
【What You Get】 – 19" deep replacement kitchen drawer box made of durable plywood, designed for cabinets with 19–21" drawer slide depth. Ships unassembled with pre-cut panels and pre-drilled holes for fast setup. Screws included. Assembly typically takes about 5 minutes.

Replacement Guide Rollers: Used to replace worn or missing guide buttons for easy gliding and to prevent wear on the cabinet's face frame or drawer opening

