First, remove the door and clean the hinges, frame, and door edges. Align the hinge cups with the pre‑drilled 35 mm holes, then drill 1/16″ pilot holes using the jig’s stop collar for depth control. Fill any stripped holes with wood filler or a threaded insert, let it cure, and re‑drill pilots. Press the cups in, insert #6 ⅝‑inch screws, and tighten just enough to avoid stripping. Finally, adjust the cam and depth screws for a uniform gap and smooth swing—more details await if you keep going.
Gather Tools for Concealed Cabinet Hinges
Gathering the right tools is the first step to installing concealed cabinet hinges correctly. You’ll need a drill or driver, a screwdriver, a clamp, a 1/16‑inch bit for screw pilot holes, and a hex wrench for jig tightening. Verify tool hinge compatibility: the jig’s glass‑filled nylon base fits 35 mm concealed hinges and accommodates 1.38‑inch and 1.02‑inch hinge cups. Use the indexing cams to set offset, the stop collar for depth, and the pilot‑hole template for precise hinge aesthetic alignment. The jig includes a 35 mm Forstner bit, carbide‑tipped bit, 2 mm twist drill, hole opener, and checking ring. Secure the jig with set pins and the C‑type clamp, then attach the hexagon socket wrench, spring, and bearing washer for final assembly. The stop collar ensures consistent hole depth for each hinge cup. Choosing the appropriate load capacity of the cabinet helps prevent over‑stress on the hinges during regular use. Properly aligning the hinge plates can also reduce wear and extend the door’s lifespan. tightening screws is essential for maintaining a secure attachment. Installing cabinet door handles first a similar set of precision tools to achieve a professional finish.

【High Precision】 All metal cabinet hinge jig made of high quality aluminum alloy,The bottom surface is very flat, Is more durable and accurate than plastic jigs. The all metal concealed hinge jig bulit-in double bearings ,the lateral shaking is reduced, and the drilling is more stable and accurate.provides continuous hinge hole drilling and much easier, making drilling more accurate.

【2-in-1 Hinge & Door Jig】: Compatible with kitchen cabinets, bathroom vanities, wardrobes, TV stands, and more. Functions as both a 35mm hinge drilling guide and a cabinet door mounting jig. The built-in alignment system keeps doors perfectly flush for stable one-person installation.

Precise & Adjustable Design: The Yakamoz 35mm Concealed Hinge Jig Kit ensures accurate and clean hinge installation every time. Features a fully adjustable depth (15-40mm) and positioning guide for flawless results on cabinet doors and furniture.
Remove and Clean Cabinet Doors for Concealed Hinges
Before you start re‑installing, release the door by locating the concealed‑hinge release mechanism—usually a clip, button, lever, or tab on the back of the hinge housing. Feel the back of the hinge while holding the door securely; press or squeeze the clip to disengage the door from the mounting plate. With a helper, pull the door away, releasing top and bottom hinges sequentially. Set the door aside on a stable surface to guarantee door safety. Wipe the cabinet interior and frame with a damp cloth, removing dust, grease, and residue from the hinge mounting plates. Vacuum loose debris from the box and tracks, then dry all surfaces. Clean the door faces, edges, and interiors, especially the hinge mortises and cup holes. Remove handles or knobs for full access, and inspect for damage before proceeding to hinge lubrication. Ensure the cabinet is stable before applying pressure. Proper alignment of the hinge plates prevents door sagging and ensures smooth operation. Use a torque screwdriver to tighten screws to the manufacturer’s recommended torque setting. Follow the lock‑replacement guide to verify proper lock alignment after re‑installing the doors.
Measure and Mark Exact Placement of Concealed Hinges
If you want the hinges to line up perfectly, start by overlaying the closed door onto the cabinet frame and marking the exact coverage. Tape the frame edge, align the door, and record the overlay, typically 1¼ in. Verify a uniform 1/16‑in. reveal by shimming the door before final marks. Use a combination square to draw a line parallel to the hinge side, inset ⅞ in. (≈21.5 mm) for the edge inset. Measure 3–5 mm from the door edge for the bore, adjusting to 6 mm for specific hinges. Mark vertical hinge centers 3½ in. from top and bottom, spacing plates 32 mm apart. Double‑check all distances with a tape measure, then record the layout for consistent hinge alignment across all doors. Concealed hinges eliminate the need for a rebate on the door. Choosing the right hinge also depends on its load capacity to ensure durability under frequent use. Proper alignment helps maintain the smooth operation of the cabinet doors over time.
Drill Pilot Holes for Concealed Cabinet Hinges
Where do you start? Clamp the concealed‑hinge jig to the door after drilling the 35 mm Forstner cup. Keep the jig attached, then insert the 1/16″ starter bit. Drill a shallow hole to mark the pilot location, then switch to the 1/16″ bit with painter’s tape wrapped as a visual depth stop. Use the jig’s stop collar for automatic depth control; it prevents over‑drilling and matches the hinge cup’s required depth. Hold the drill vertically and let the jig alignment guide the bit straight into the marked spot. If you have a self‑centering bit, you can drill all four pilot holes simultaneously. After each pilot, verify that the hole does not exceed the screw length before proceeding to final screw installation. Ensure the drill rotates clockwise to maintain proper cutting action. Properly measure hinge placement before drilling to avoid misalignment. This approach also supports flexible storage by allowing the cabinet to be reconfigured for items of varying sizes. For older hinges, adjusting the screw tension can correct sagging doors.

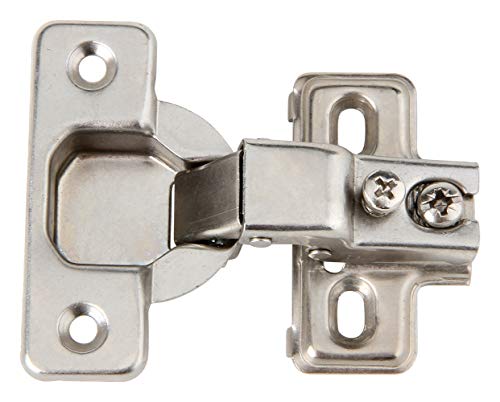
Concealed Hinge Jig: Dedicated jig for drilling precise 35mm cup holes for European-style concealed cabinet door hinges using any hand drill

【DURABLE AND ACCURATE】All metal cabinet hinge jig made of high quality aluminum alloy is more durable and accurate than plastic jigs. The all metal concealed hinge jig bulit-in double bearings provides continuous hinge hole drilling and much easier. The 35mm carbide tipped bit is solid and sharp for cabinet door hinges installation. Concealed cabinet hinge jig wood hole puncher locator help you drill accurate and fast as drill press.

Two edge alignment knobs position the cup hole from the edge of the door, while the edge pin sets the distance from the top/bottom.
Fix Stripped Holes Before Installing Concealed Hinges
Start by restoring the stripped hole so the hinge screws will hold securely. Choose a repair method that matches the damage size and material. For small gaps, insert wood filler or epoxy repair into the hole, press it in with a putty knife, and let it cure per the manufacturer’s timing. For larger stripped areas, try the toothpick and glue method: coat toothpicks with wood glue, pack them tightly, break off excess flush, then let the glue set. If the hole is severely damaged, drill a pilot for a threaded insert, apply epoxy repair, and screw the insert flush. Alternatively, use a wooden dowel coated in glue, let it cure, then drill a pilot in the dowel before re‑screwing the hinge. Verify the filler is fully cured before proceeding. Short screw length often contributes to insufficient grip in wood. Adding a pilot hole before inserting a dowel helps ensure proper alignment and prevents splitting.

J-B WELD KWIKWOOD: A hand mixable two part epoxy putty stick that is formulated to repair and rebuild wood. J-B Weld KwikWood is designed for all wood household DIY repairs!

Two-part epoxy paste to replace missing or rotted wood is resistant to dry rot, UV light, fresh and salt water

Two-part epoxy paste to replace missing or rotted wood is resistant to dry rot, UV light, fresh and salt water
Install Concealed Hinge Cups and Screws
Once the hinge cups are drilled and test‑fitted, press each cup firmly into its 35 mm hole until the flange sits flush against the door surface, then drill pilot holes through the cup’s screw openings with a self‑centering bit, and finally guarantee the cups using ⅝‑inch #6 wood screws—install one screw first to verify alignment, then add the second, tightening just enough to avoid stripping. Use a drill to ensure clean pilot holes, and measure from bottom and top of door 75 mm to ensure consistent cup placement. Choose the appropriate cup hinge styles before drilling; standard concealed hinges use two cups per corner, spaced 7/8 in from the edge and 3½ in from top and bottom. Verify placement with a rafter square, then clamp the jig to maintain consistency. After pilot holes are clean, insert the screws, confirming that the flange remains flush. Proper installation enhances hinge durability and guarantees smooth door operation. Selecting the right hinge type, such as a full overlay model, can further improve load capacity and aesthetic integration. Magnetic cabinet locks provide an extra layer of security when combined with concealed hinges.
Made from steel with a steel nickel plated finish
Attach Doors Using Concealed Cabinet Hinges
How do you guarantee a concealed hinge aligns perfectly when attaching a cabinet door? Position the door against the cabinet front, using a foot or scrap block to hold it at the correct vertical height. Clamp a mounting jig to the bottom for support, then open the door to align the hinge plates. Insert one **#6 ⅝‑inch screw into each oblong hole on the door side, drill pilot holes first, and press the hinge mechanisms onto the cabinet plates for a fit check. Close the door, inspect door alignment, and adjust by loosening the oblong‑hole screws. Once the gaps are even and the hinge finish sits flush, drill pilot holes for the remaining round‑hole screws, secure them, and lock the hinge in place. This establishes precise alignment before final tightening. The cup holes must be drilled to a 1 ⅜ in diameter to accommodate the hinge mechanism. Soft‑close hinges provide a quieter operation and reduce wear over time. Parallel edge placement ensures the door sits squarely within the cabinet frame. Adding a high‑quality lock** to the cabinet further enhances security against unauthorized entry.
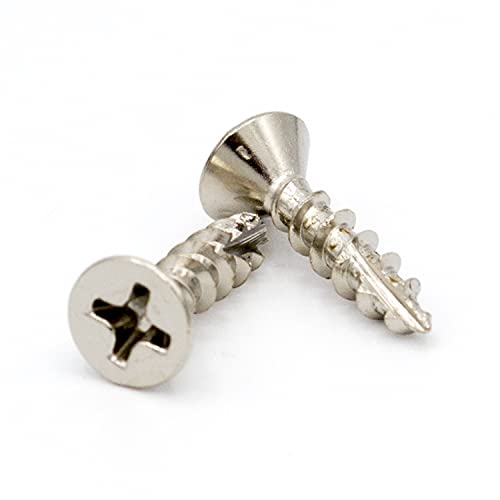
【For European Hinges & More】Ideal Screw for European concealed hinges. Sits and matches perfectly for most common brands of hinges
【For European Hinges & More】Ideal Screw for European concealed hinges. Sits and matches perfectly for most common brands of hinges

Installation Specification: Cup diameter is 35mm; Cup depth is 11.5mm, Screw holes distance is 45mm; Opening angle is 105 degrees, suitable for most cabinet door styles. Each slow close cabinet hinge comes with 2 easy-on dowels and 3 self-tapping wooden screws to ensure a perfect fit.
Fine‑Tune Concealed Cabinet Hinge Adjustments
A few quick steps let you fine‑tune a concealed cabinet hinge so the door sits flush and opens smoothly. First, tighten each mounting screw against the face frame with a hand screwdriver; this prevents the finish slipping and establishes a solid tension lining. Next, locate the side‑to‑side cam screw, loosen it, and slide the door left or right until the gap is even, then retighten. Adjust the vertical screw to raise or lower the door, checking with a level for a uniform finish. Finally, turn the depth screw to pull the plate in or out, achieving a seamless t finish at the front edge. Verify all gaps, test operation, and secure every mounting screw before releasing the door. Use a hand screwdriver to avoid stripping the soft‑wood face frame. For wider doors, consider adding a third hinge to ensure proper weight distribution and smooth operation. Check the hinge alignment before final tightening.