First, confirm your door’s thickness—most concealed hinges need a ¾‑inch panel—and pick a UL‑certified kit that matches the cabinet style and weight. Mark the hinge centers, usually ½‑inch from the edge, then draw a line ⅞‑inch inset and set top and bottom locations 100 mm from the edges. Clamp the jig, drill 1/16‑inch pilot holes, and use a 35 mm Forstner bit with a stop collar for the cups. Insert the cups, drive the screws just enough to hold, then tighten fully, adjusting the middle screw for vertical alignment and the side screw for horizontal positioning until the door swings evenly with a uniform 1/8‑inch reveal. Continue to uncover detailed troubleshooting tips and final checks.
Gather Materials and Measure for Installing Concealed Hinges
Before you begin, gather every tool and material you’ll need and then measure the door precisely. Measure the storage cabinet door thickness; most concealed hinges require a **¾‑inch panel, so confirm that dimension before proceeding. Use a tape measure or ruler to mark hinge centers from the edge, following the overlay specification—typically a 1/2‑inch offset. Clamp the hinge jig to the door back, set the depth collar to match the cup depth, and verify alignment with a scrap template. Drill pilot holes with a 1/16‑inch bit, then use the appropriate Forstner bit to create the hinge cups, ensuring the hole depth matches the hinge aesthetics. Keep a shop vacuum handy to clear debris, and double‑check all measurements before securing the hinges. Wider doors often three hinges for added support and smoother operation. Selecting the right material for the cabinet can affect the durability and load capacity of the hinges. Properly aligning the hinge screws can prevent door sag** and ensure consistent operation.


【Fully Invisible】Hidden hinges can be completely hidden when cabinets, folding doors are closed for a cleaner look. Hidden hinges are mounted on the door and open at a maximum angle of 180 degrees. When cabinets and folding doors are closed, the hidden hinges can be completely hidden for a cleaner look.

Installation Reference: Hing Cup diameter: 35mm, Cup depth: 11.8mm, Screw holes distance: 45mm, Opening angle: 105 degrees.
Choose the Right Concealed Hinge Kit and Prepare Tools
Choosing the right concealed‑hinge kit starts with matching the hinge type to your cabinet’s construction, door thickness, and opening angle, then confirming the kit includes the necessary plates, screws, and any soft‑close components. Verify that the kit offers a long‑arm model for frameless cabinets or a compact unit for face‑frame doors, and that the door meets the minimum 1‑½‑inch thickness for heavy‑duty hinges like the HES3D‑E190. Check the fire rating; select UL‑certified, three‑hour fire‑rated hinges for concealed installations. Assemble your tools: a drill with a 35 mm Forstner bit, a compatible concealed‑hinge jig, screwdriver, tape measure, pencil, and a clamp. Make sure each tool matches the kit’s specifications to avoid mismatched drill bits or screw sizes. Consider the load capacity of the hinge to ensure it can support the door weight over time. Understanding the soft‑close mechanism helps you choose hinges that reduce noise and wear. Different hinge styles, such as soft‑close, can also affect the overall durability and user experience.
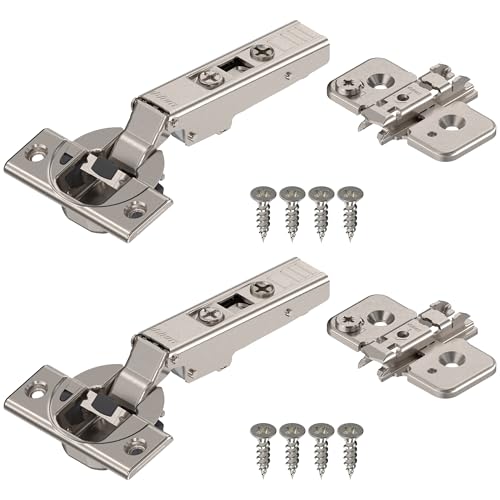
1 Kit Includes = 2 plates + 2 hinges + screws for hassle-free installation; fits door thickness from 16 mm (5/8”) to 26 mm (1”). Blum logo cover caps shown in some images are decorative and not included in this kit.

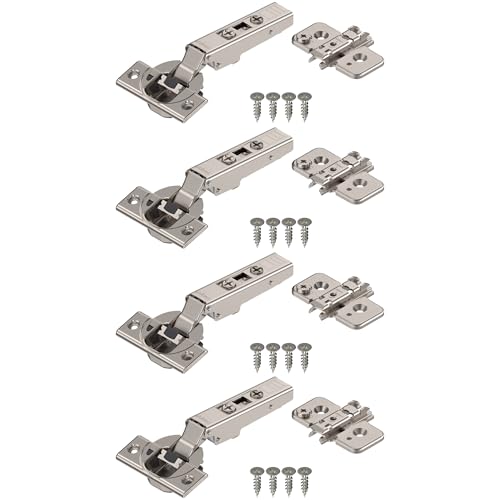
3 Kits Includes = 6 hinges + screws; fits door and frame thicknesses of 19 mm (3/4”); for square edge doors. Blum logo cover caps shown in some images are decorative and not included in this kit.
2 Kits Includes = 4 plates + 4 hinges + screws for hassle-free installation; fits door thickness from 16 mm (5/8”) to 26 mm (1”). Blum logo cover caps shown in some images are decorative and not included in this kit.
Mark Precise Placement for Concealed Hinges
Where do you start? Begin by setting a combination square to draw a line parallel to the hinge side, inset ⅞ inch from the edge. Hold the door against the cabinet frame, then mark the top and bottom hinge locations 100 mm (or 3½ inches) from the edges, adjusting to 2‑3 inches for kitchen cabinets or UK standards. Use a tape measure to verify each distance, ensuring the marks align vertically. Sketch a centerline on the door edge for the jig, then clamp the jig securely. Align the Kreg offset to the hinge specification—6 mm for IKEA, for example—so the cup hinge aesthetics remain consistent and the hinge durability isn’t compromised. Double‑check all marks before drilling. Long‑arm hinges can accommodate both frameless and face‑frame cabinets, offering opening angles up to 170°. Properly pre‑drilling holes prevents wood splitting and ensures a smooth installation. A tight screw tension helps keep the hinge stable and reduces future loosening. Selecting the right material finish enhances both durability and style, complementing the overall décor.
Drill Pilot and Cup Holes for Concealed Hinges
Once the jig is clamped securely and the marking lines are verified, you’ll drill the pilot and cup holes in a strict sequence. Begin with the 1/16‑inch bit, lightly boring shallow starter holes through each cross. Keep the drill straight, stop at the tape‑markediveive depth, and repeat at both door ends for every hinge. Switch to the 35 mm Forstner bit, attach the stop collar, and drill the cup holes to a precise 13 mm (½ in) depth. Periodically test fit to avoid over‑drilling, maintaining perpendicular alignment. After cup drilling, change back to the 1/16‑inch bit for screw pilot holes. Use the self‑centering bit through the hinge plates, ensuring each of the four screw holes per hinge aligns perfectly for screw alignment before moving on. Measure 22.5 mm from the door edge to locate the guide intersection for accurate drilling. Properly aligning the slides during installation helps prevent drawer binding and ensures smooth operation. Follow the guide for cabinet door handle installation to achieve a professional finish. Selecting the correct load capacity ensures the hinge can support the door weight over time.

【Product Size】Drilling diameter:35mm | 1-3/8", Round Shank Dia.: 10mm | 2/5", Drilling depth: 60mm | 2-3/8", Total length: 94mm | 3-11/16"

【PROFESSIONAL 35MM HINGE INSTALLATION BIT】 This carbide-tipped Forstner bit is precision-engineered for one key task: drilling perfect 35mm (1-3/8") cups for concealed cabinet hinges and door locks. Achieve workshop-quality results in hardwood, plywood, MDF, and plastic for a flawless finish every time.

[SPECIAL DESIGN] Using these sharp drill bits, you can drill accurate, smooth, neat holes without burrs, even in end-grain and through knots. Arc curve design head contributes to removing sawdust faster, making your work more efficient.
Install Concealed Hinges on the Door
Now that the pilot and cup holes are perfectly aligned, you can move on to attaching the concealed hinges to the door. First, insert each hinge cup into its drilled hole until the flange meets the door surface; this protects the door finish and preserves hinge aesthetics. Use the jig‑marked positions to drill pilot holes for the screws, then drive the screws into the oblong holes for initial placement. Tighten those screws just enough to hold the hinge without forcing the door. Next, add the remaining round‑hole screws, securing the hinge firmly. Throughout, keep the door flat against the cabinet, support it with one hand, and verify that the hinge sits flush, maintaining a clean line that complements the door finish and overall hinge aesthetics. The Craig jig ensures consistent cup depth and prevents punching through the door. Properly tightening the screws prevents sagging doors and maintains alignment over time. Selecting the appropriate magnetic holding strength can help keep the door securely closed while allowing easy access. Adjusting the hinge’s screw tension allows fine‑tuning of door swing and eliminates minor misalignments.

【High Precision】 All metal cabinet hinge jig made of high quality aluminum alloy,The bottom surface is very flat, Is more durable and accurate than plastic jigs. The all metal concealed hinge jig bulit-in double bearings ,the lateral shaking is reduced, and the drilling is more stable and accurate.provides continuous hinge hole drilling and much easier, making drilling more accurate.

Precise & Adjustable Design: The Yakamoz 35mm Concealed Hinge Jig Kit ensures accurate and clean hinge installation every time. Features a fully adjustable depth (15-40mm) and positioning guide for flawless results on cabinet doors and furniture.

Efficient and Precise Drilling: Speed up your drilling process by 50% compared to traditional methods with this 35mm hinge drilling jig and Forstner bit, ensuring accurate, flat-bottomed holes every time.
Align and Secure Concealed Hinges to the Cabinet Frame
If you position the mounting plate on the cabinet frame and align it with the pre‑marked locations, you’ll set the stage for a tight, flush hinge installation. Use a rafter square to confirm exact door‑door alignment; clamp the plate if it shifts while you drill pilot holes. Insert a self‑centering bit through each screw hole, drilling perpendicular to avoid wood split. Match the bit to a #6 screw diameter, then drive a ⅝‑inch #6 screw clockwise until it bites firmly, maintaining hinge clearance. Repeat for top and bottom plates, checking that each is equally tightened. Snap the hinge cups onto the plates, listen for the click, and verify that the door remains flush without wobble before proceeding. Tighten the upper hinge gently before final adjustment to prevent loosening in the soft‑wood face frame. Metal cabinets provide fire‑resistant durability essential for high‑traffic industrial environments. Selecting hinges made from high‑strength steel ensures the assembly can withstand heavy loads over time. Use a wood filler to reinforce any stripped screw holes before re‑drilling.

4 Kits Includes = 8 plates + 8 hinges + screws for hassle-free installation; fits door thickness from 16 mm (5/8”) to 26 mm (1”). Blum logo cover caps shown in some images are decorative and not included in this kit.

【2-in-1 Hinge & Door Jig】: Compatible with kitchen cabinets, bathroom vanities, wardrobes, TV stands, and more. Functions as both a 35mm hinge drilling guide and a cabinet door mounting jig. The built-in alignment system keeps doors perfectly flush for stable one-person installation.

The hinge drill guide can help you quickly drill the perfect concealed hinge hole. Suitable for furniture door cabinet hinge positioning and installation
Fine‑Tune Position of Concealed Hinges (Up/Down, Left/Right)
After the mounting plates are securely fastened and the hinge cups snapped into place, you can fine‑tune each hinge’s position. First, locate the middle screw that controls vertical height. Loosen it just enough to let the door move up or down, then lift or press the door to the desired level. Adjust each hinge uniformly, staying within a three‑millimeter range, and retighten the screw to the proper screw torque, checking that hinge tension remains consistent. Next, find the side‑to‑side screw on the front or edge of the hinge. Loosen it, slide the door left or right, and turn the screw clockwise or counter‑clockwise to lock the new position. Make incremental changes, verify even gaps, and secure the screws with the same torque to maintain balanced hinge tension. The back screw can also be tightened to reduce the gap between the door and the cabinet frame. For optimal alignment, ensure the door is level using a spirit level before final tightening. If you notice any structural damage to the cabinet frame, it may be time to consider a full replacement rather than continued adjustments.
Verify Gaps, Troubleshoot Mistakes, and Complete the Install
When you’ve tightened the hinges, measure the clearance on every edge to confirm the 1/8‑inch reveal for inset doors or the 0.062‑inch standard for full‑overlay cabinets; any deviation signals a mis‑alignment that you’ll need to correct before finalizing the install. Conduct a gap inspection on all sides, checking for 1/8‑inch clearance on inset doors and 0.062‑inch on overlay doors, and verify a 1/4‑inch gap between paired full‑overlay doors. If gaps are uneven, perform alignment verification by loosening the front screw, moving the hinge inward, and retightening incrementally while re‑measuring. Adjust for face‑frame variations such as 1.5‑inch stiles or 2.5‑inch rails. Once uniform gaps meet the specified tolerances, fully tighten all screws, test door swing, and confirm the install is complete. The three‑screw configuration on each hinge allows precise height adjustment to eliminate top‑gap issues.