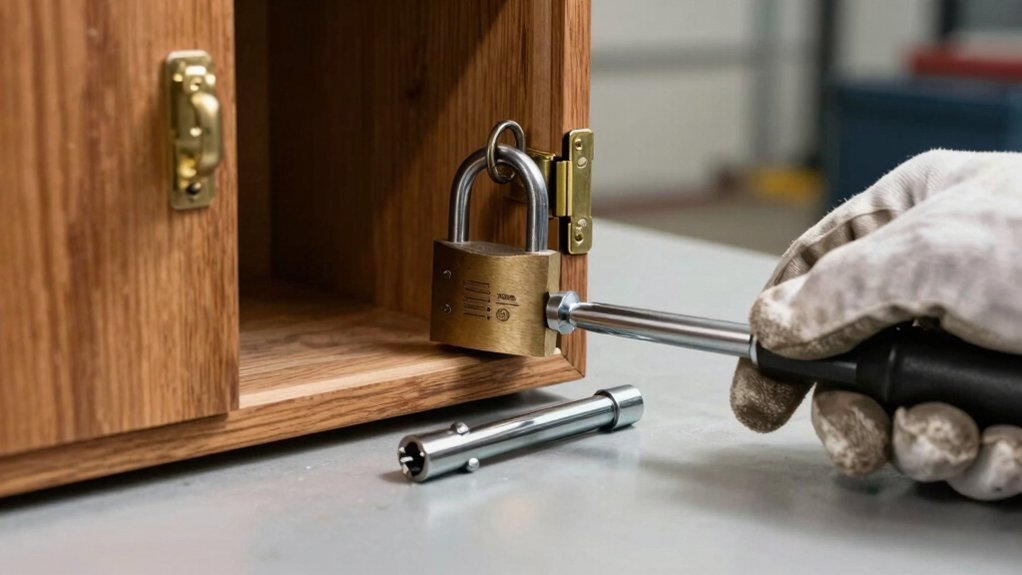
Secure the cabinet with a helper or a sturdy prop, then clear the area and remove the door’s handles. Using a Phillips driver, tap the screw head lightly for grip and unscrew the bottom hinge first, moving upward to keep the door stable. If a hole is stripped, drill a ¼‑inch cavity, insert a two‑part epoxy‑coated dowel, let it cure, trim it flush, and sand smooth. Mark the new hinge centers, drill 1/16″ pilot holes with a depth stop, then drive the appropriate #3‑#4 or #8‑#10 screws, tightening incrementally while checking for plumb alignment. Finish by installing lock washers or thread‑locker to prevent loosening. Continue for, you uncover deeper troubleshooting tips.
Safety First: Secure the Cabinet
When you begin removing the hinge, first make sure the door is supported by a helper or a sturdy prop so it won’t fall once the screws come out. Perform a protect assessment of the surrounding area: clear debris, guarantee the floor is dry, and keep traffic away to avoid slips. Position the door in a level, stable alignment before marking hinge locations, and remove handles or knobs to prevent damage. Hold the door firmly while you mark screw holes with a pencil or awl, then verify that the cabinet frame shows no cracks that could compromise cabinet stability. Place the removed door on a secure surface away from edges, and keep a helper ready to maintain support throughout the process. This disciplined setup minimizes risk and prepares the workspace for precise hinge replacement. Check the hinge for printed overlay markings to verify door‑to‑cabinet coverage before proceeding. Consider the material durability of the hinge to ensure it matches the cabinet’s overall construction quality. Understanding the adjustable shelf concept helps you select hinges that accommodate future storage modifications. Follow the step‑by‑step guide in the installation manual to ensure each hinge is aligned correctly.
Gather Tools for Replacing Hinge Screws
Now that the door is securely supported, gather the tools you’ll need to replace the hinge screws. Begin with tool organization: a drill equipped with 1/8‑inch to 7/32‑inch bits for pilot holes and enlarging stripped sites, a drill/driver or screwdriver for removal and installation, and an angled bit holder for tight spaces. Include hand tools such as hex keys, needle‑nose pliers, and a hammer for seating wooden plugs. For material sourcing, locate threaded 6‑32 inserts, matching 6‑32 × 3/8‑inch screws, and any replacement hinges. Keep a pencil or awl, measuring tape, painter’s tape, and a flat surface protector nearby for marking and depth control. This concise kit guarantees efficient, precise screw replacement. Match the new hinges to the existing frameless full‑overlay cabinet style. Ensuring the hinge plates are tightly secured prevents future misalignment and maintains door stability. For wider doors, consider adding a third hinge to improve load distribution. Properly aligning the drill holes with the pre‑drilled template ensures consistent spacing and a professional finish.
Remove Old Cabinet Hinge Screws Carefully
If the hinge screws are stripped or rusted, start by seating a Phillips‑head screwdriver firmly into the head, then tap it lightly with a hammer to gain grip before applying steady downward torque; this quick‑tap‑and‑turn method works best on exposed, unpainted screws, while painted‑over or heavily rusted fasteners may require a low‑speed drill with a small, arrow‑shaped bit to chip away paint and expose the shaft before unscrewing. Next, assess each painted screw for paint thickness. Use the arrow‑shaped drill bit on low speed, positioning it directly over the screw head. Lightly chip away the paint, keeping pressure minimal to avoid deforming the head. Once the shaft is visible, re‑insert the screwdriver and turn counter‑clockwise, applying firm downward force. For rusted hinges, repeat the tap‑and‑turn step if the screw still resists. Work from the bottom hinge upward to maintain door stability during hinge removal. This systematic approach prevents further stripping and guarantees clean extraction. Small arrow‑shaped bit should be selected for precise paint removal. Proper torque ensures the hinge functions smoothly and bracket the door alignment. Additionally, adjusting the hinge’s screw depth can help fine‑tune door clearance and reduce wobble.
Repair Stripped Screw Holes With Dowels
After you’ve cleared the stripped screws, fill the damaged holes with wood dowels to restore a solid grip for the new fasteners. Choose a ¼‑inch dowel whose diameter matches or slightly exceeds the hole. Drill the existing cavity with a ¼‑inch bit just until resistance stops, then vacuum out dust. Mix a two‑part epoxy on scrap cardboard and coat the dowel ends; apply generous wood glue inside the hole for extra bond. Tap the dowel in with gentle hammer strikes and let the adhesive cure fully, typically several hours. Once hardened, perform dowel trimming using an oscillating tool or flush‑cut saw, then sand with 120‑grit paper to a flush surface. This prepares a robust anchor for the replacement hinge screws. Use a taped drill to control depth when routing out the stripped hole. For a secure magnetic cabinet lock, ensure the metal plate is properly aligned with the strike plate. Consider applying a reinforcement brace to prevent future stripping.
Mark New Hinge Screw Locations Accurately
When you line up the hinge edge, start by placing a knife tic mark across the lid‑separation line with a combination square; this shallow cut serves as a reference for the outer hinge edge and guarantees the subsequent screw‑location marks stay perfectly aligned with the hinge outline. Next, measure the hinge center using a tape measure: record 100 mm from the top to the top hinge, 100 mm from the bottom to the bottom hinge, and for three‑hinge doors locate the middle hinge from the top. Align the plastic marking jig so its center matches each hinge center, then set the jig’s edge distance to door thickness + 38.5 mm (e.g., 25 mm door gives 63.5 mm). Press the jig firmly, mark both sides of the line, and verify hinge alignment with a square. Finally, apply a modest screw torque—just enough to seat the screw without stripping—to ensure consistent, repeatable placement. Measure each hinge from the top and bottom of the door to account for handedness verification. Proper door alignment reduces sagging and ensures smooth operation. Selecting the appropriate hinge type, such as a soft‑close hinge, can further enhance durability and quiet operation.
Drill Pilot Holes for Hinge Screws
With the hinge edge marked and the jig set to the correct depth, you now drill the pilot holes that guide the screws. First, select a 1/16″ bit for a shallow starter hole that marks each location without penetrating the material. Use a self‑centering hinge bit with a spring‑loaded guide for #3‑#4 screws (5/64″) or #8‑#10 screws (9/64″), matching the screw sizing to the cabinet wood. Attach the bit to a power drill, set the stop collar or apply painter’s tape as a depth stop, and keep the drill vertical to control drilling depth. Apply steady drilling torque; excessive force can split the material. For concealed hinges, swap to a Forstner bit sized to the hinge cup depth (≈35 mm) to guarantee a clean, centered pilot. This precise preparation prevents wood splitting and guarantees a snug screw fit. Measure the hinge placement before drilling to ensure proper alignment. Properly assessing the cabinet’s load capacity helps avoid over‑tightening that could compromise the wood’s strength. Accurate drilling is essential for smooth operation and longevity of the hinge system. Regularly dust and wipe the hinges to prevent buildup that can impede movement.
Install New Hinge Screws and Re‑hang Door
If you’ve already drilled the pilot holes, the next step is to install the new hinge screws and re‑hang the door. Choose screws of the same length and thread size, but consider a longer, coarse‑thread screw if the wood is soft or the original holes stripped. Pick a screw material that resists corrosion—stainless steel or brass work well in kitchens. Align the hinge, drive the bottom screw with firm, but controlled, hinge torque; avoid overtightening to prevent stripping. Repeat for the top hinge, checking that both screws sit flush and the hinge plates stay level. With a helper, lift the door, position it, and mark the cabinet‑side holes. Install the top cabinet‑side screw first, then the bottom, tightening incrementally. Verify the door hangs plumb, swings freely, and that no screw spins under load before re‑installing knobs. Ensure the MDF backing block is securely attached before tightening the new screws. Precise measurement is essential for proper alignment. A typical storage cabinet can be assembled in 30 minutes when the workspace is organized and tools are ready.
Fix Common Problems After Screw Replacement
After tightening the new hinge screws and rehanging the door, you may still encounter issues such as stripped holes, loose hinges, or misaligned doors that compromise functionality. First, address stripped screw holes: insert toothpicks coated in wood glue, let them dry, then re‑drill for a tight grip; for larger damage, apply wood filler or a wooden dowel with glue, allowing full cure before re‑screwing. Use plastic anchors only in soft wood, drilling a smaller pilot hole first. To prevent vibration‑induced loosening, install lock washers or thread‑locker on each screw and consider hinge reinforcement with longer or thicker fasteners. Check for play after each adjustment; if the hinge still moves, replace the screw with a sturdier one and verify door alignment by wedging the door level before final tightening. Tightening the screw alone is ineffective when the hole is stripped.